Imaging session with new mount and first successful guiding setup! M51 and M101 acquired.
Following the post about last nights failure due to the camera and scope disconnecting, the weather was good to go again.


Took everything outside and got setup.
Star and Polar Alignment
Last night, I hadn't set up the polar alignment properly, so tonight I had actually decided to read the manual to see how it is done on this mount, without a polar alignment scope or camera.
On my old mount I used to use SharpCap to do the polar alignment, and this would usually take between 20 and 50 images to get the scope to the 'Excellent' rating in SharpCap.
With this mount things were a lot different.
First up, I used my phone to get True North (not magnetic North) and aligned the North tripod leg to this.
Next up, switching on the mount, I connected the Celestron CPWI application on the laptop to the mount. I then started out the star alignment, this is done by selecting a star and then adjusting the star so it is central in the eyepiece, I use the mount handset to do the adjustment, as I can look through the eyepiece at the same time, rather than having to look back at the laptop screen to make adjustments. Repeating for several more stars. I found that after the first 2 stars, number 3 onwards were already central in the eyepiece. I did 6 stars this way just to satisfy myself that it was that good!
Then from the CPWI application menu, I select the ASPA (all star polar align) menu. Following these I selected a target in the sky, in this case, the star Spica (https://en.wikipedia.org/wiki/Spica), which was also the last start I had used for the star alignment phase. The mount then calculates how much out the polar alignment is, then moves the telescope position by this error amount. You then use the Azimuth and Latitude adjustment screws on the mount to bring the alignment star back central in the eyepiece. Once that is done, you have completed both a star alignment and a polar alignment. Compared to my previous mount, this is so much easier, adn 0 pictures taken so far, so no camera battery wasted doing setup!
Autoguiding and PHD2
I had never been able to use my autoguiding scope and PHD2 as it was all too heavy for the previous mount. However I had tried to get the guidescope and guide camera seeing and following a star on their own.
I had never managed to achieve a good quality image from the Bresser Camera that came with the guide scope kit. No matter what settings I used or how well I focused.
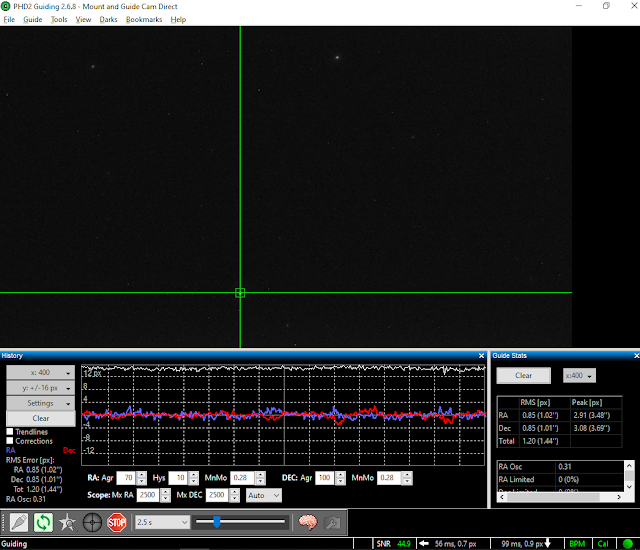
However, when I was setting this up this time, I did notice in the list of cameras a ToupSky camera, and remembered that ToupSky Imaging software was mentioned on the GuideScope literature. So, I changed from the correct Bresser Cam Driver to the ToupSky Camera and immediately had good images!
I picked a star and PHD2 commenced a calibration and bingo it was working now! This is the first time I had got this far.
Just need to look and see if I need to do any more settings tweaks to get any better guiding. The more accurate the better for longer exposures.
Target Time
I went to a few different targets to see what they were like, took a single sub with the camera, to check the object size and every target was smack bang in the middle of the FOV.
After having had a look at M82 Cigar, M64 Black Eye, I had decided I was going to do M51 Whirlpool Galaxy and M101 Pinwheel Galaxy.
Remember, I have limited battery capacity on the camera, so didn't dedicate all battery time to just one target, but a couple, I can always go back and do longer imaging sessions in the future once I can get hold of a DC coupler or a second battery.
So, here is what I managed to acquire and did some basic cleanup the next day;
M51 Whirlpool Galaxy
23 million light years from Earth, 60,000 light years in diameter and estimated to contain 100 billion stars.
Read more on wiki: https://en.wikipedia.org/wiki/Whirlpool_Galaxy
M101 Pinwheel Galaxy
21 million light years from Earth, 170,000 light years in diameter and estimated to contain 1 trillion stars.
Read more on wiki: https://en.wikipedia.org/wiki/Pinwheel_Galaxy
Its all coming together!
Clear skies!


Hi Dave,
ReplyDeleteI have the same problem with my bressercam. Calibration always failed.
I'm going to try the same setup from you.
camera: toup tek
mount: on -camera
aux mount: poth hub (?)
Nice pics btw!
wim.
This comment has been removed by the author.
DeleteHi there, for info, going forward, astrophotography related content will be on my dedicated site Https://daves-astrophotography.com/
DeleteYeh, camera Toup Tek, for mount because I was using CGX, it is set to CPWI, aux mount is not applicable.
If I remember, On Camera for mount setting is if you are using ST4 cable and pulse guiding.